
Unlock the true potential of your Android device by installing TWRP Recovery. This comprehensive guide provides a detailed walkthrough for installing TWRP, a custom recovery that empowers Android enthusiasts with advanced control over their devices. TWRP Recovery opens doors to a world of customization, allowing you to flash custom ROMs, create backups, and much more. Whether you’re a seasoned modder or just starting your Android customization journey, understanding how to install TWRP is a crucial first step.
This guide provides a clear and concise methodology for installing TWRP Recovery on a variety of Android devices. We cover the necessary prerequisites, the TWRP installation process itself, and common troubleshooting tips. Learn how to safely and effectively install TWRP, enabling you to take full advantage of the powerful features this custom recovery offers. From flashing custom ROMs and kernels to creating complete backups of your system, TWRP Recovery is an essential tool for any serious Android user. This guide equips you with the knowledge and steps required to successfully install TWRP and begin your journey into the world of Android customization.
Understanding TWRP Recovery
TWRP (Team Win Recovery Project) is a custom recovery environment for Android devices. It replaces the stock recovery software that comes pre-installed on your phone. TWRP offers a powerful interface with a range of advanced features beyond the basic factory reset options.
Why use TWRP? Primarily, it’s used to install custom ROMs (alternative Android operating systems), kernels, and other modifications. It also enables full backups and restores of your device’s data, including system files, which is crucial for safeguarding against data loss during modifications.
TWRP facilitates flashing ZIP files containing various modifications. This flexibility gives users greater control over their device’s software.
Checking Device Compatibility
Before proceeding with the installation, it is crucial to verify that your Android device is compatible with TWRP. TWRP maintains an extensive list of officially supported devices. Compatibility depends on factors like your device’s make, model, and processor.
While TWRP officially supports numerous devices, unofficial ports might be available for devices not on the official list. Be aware that using unofficial ports carries a higher risk and requires careful research. Ensure the unofficial port matches your specific device’s model and variant to avoid potential issues.
Always double-check your device’s precise model number. This information is usually found in your device’s settings under “About Phone” or a similar menu. Using the wrong TWRP image can lead to a bricked device, so accuracy is paramount.
Unlocking the Bootloader
Unlocking your bootloader is a crucial step before installing TWRP. It allows modification of the device’s core software. However, be aware that this process will void your warranty in most cases and will also perform a factory reset, erasing all data on your device. Therefore, it is imperative to back up all important data before proceeding.
The unlocking process varies significantly between manufacturers and even between device models. Some manufacturers provide official unlocking tools or instructions, while others require more involved methods. It’s essential to consult your device manufacturer’s website or reputable online forums dedicated to your specific device for detailed unlocking instructions.
Generally, the process involves enabling developer options and OEM unlocking in your device’s settings. Then, you’ll typically connect your device to a computer via USB and use commands through a command prompt or terminal interface to initiate the unlocking process.
Proceed with caution and ensure you understand the risks and steps involved before attempting to unlock your bootloader. Incorrect execution can potentially brick your device, rendering it unusable.
Downloading TWRP Image
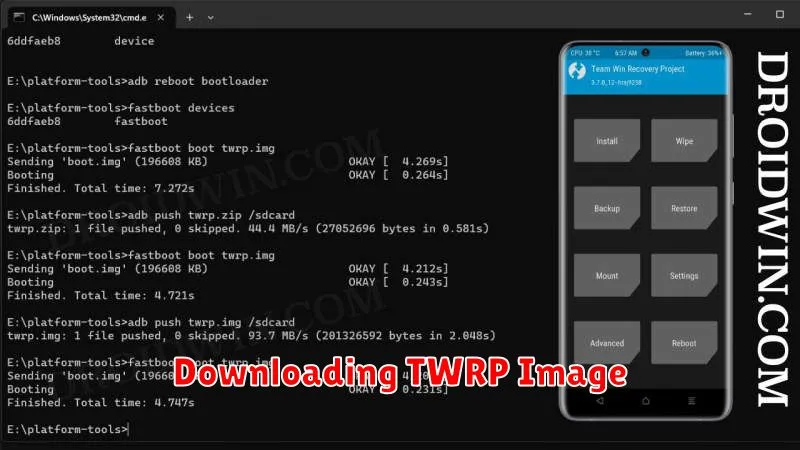
Locating and downloading the correct TWRP image for your device is crucial. Downloading the wrong image can lead to installation errors or even brick your device. Exercise caution and double-check compatibility before proceeding.
The primary source for TWRP images is the official Team Win Recovery Project website. Navigate to their devices page and locate your specific phone model. Be sure to identify the exact variant if applicable. Different variants of the same phone model may require different TWRP images.
Once you’ve located the correct device listing, download the latest stable TWRP image file, typically with a .img extension. Save this file to a location on your computer that you can easily access later, such as your desktop or downloads folder.
Installing ADB and Fastboot
ADB (Android Debug Bridge) and Fastboot are essential tools for interacting with your Android device from a computer. They are required for installing TWRP.
The easiest way to obtain ADB and Fastboot is through the official Android SDK Platform-Tools package. This package contains only the command-line tools, minimizing download size.
Installing SDK Platform-Tools
Download the SDK Platform-Tools package for your operating system (Windows, macOS, or Linux). Extract the downloaded ZIP file to a convenient location on your computer, such as C:platform-tools on Windows or /Users/yourusername/platform-tools on macOS/Linux.
Adding to PATH (Recommended): Adding the platform-tools directory to your system’s PATH environment variable allows you to execute ADB and Fastboot commands from any terminal or command prompt window. This simplifies the process significantly.
Connecting Your Device to PC
Establishing a proper connection between your Android device and your computer is the first crucial step in installing TWRP Recovery. This connection facilitates the transfer of the TWRP image file to your device. Ensure you have a compatible USB cable and the necessary drivers installed on your PC.
Begin by enabling USB debugging on your Android device. This option is typically found within the Developer Options menu in your device’s settings. If you don’t see Developer Options, you’ll need to enable it first. This is usually accomplished by repeatedly tapping the Build Number in the About Phone section of your settings.
Once USB debugging is enabled, connect your device to your computer using the USB cable. Your computer should recognize your device. If it doesn’t, you may need to install the appropriate USB drivers for your specific Android device. These drivers are often available from the manufacturer’s website.
After a successful connection, you should see a prompt on your Android device asking to allow USB debugging access for your computer. Grant this permission to proceed.
Booting into Recovery Mode
Accessing Recovery Mode varies depending on your device manufacturer. The most common method involves a combination of pressing physical buttons while powering on or restarting your device. Power and Volume buttons are typically involved. However, the exact combination can differ significantly.
For some devices, it’s Power + Volume Up, while for others, it might be Power + Volume Down or even Power + Volume Up + Volume Down simultaneously. Some devices may require you to hold the buttons for a specific duration. Consulting your device’s manual or searching online for the specific button combination for your device model is crucial.
Once in Recovery Mode, you should see a screen with various options. Navigation is usually done using the volume buttons to move up and down, and the power button to select.
Flashing TWRP
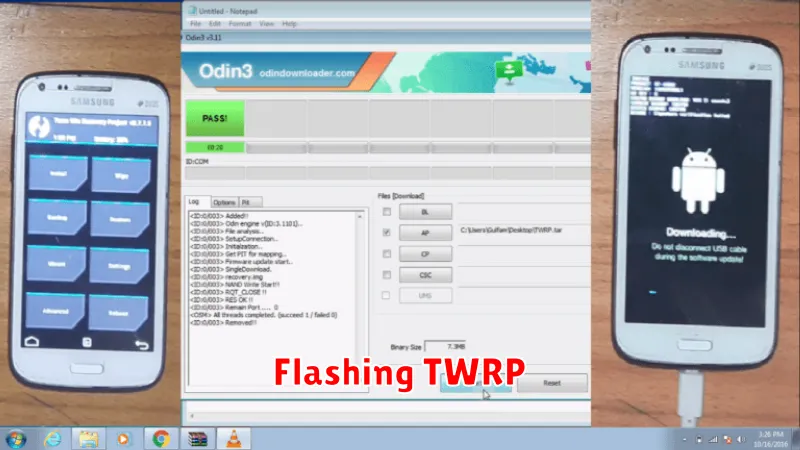
With your device connected and in the correct mode, you are now ready to flash the TWRP image file. This process permanently installs TWRP to your recovery partition.
In your command prompt or terminal window, navigate to the directory where you downloaded the TWRP image file. It’s crucial to ensure you’ve downloaded the correct image for your specific device model. Flashing an incorrect image could damage your device. Execute the appropriate fastboot command to flash TWRP. A typical command looks like this:
fastboot flash recovery twrp-device-codename.imgReplace twrp-device-codename.img with the actual name of your TWRP image file. The flashing process should only take a few seconds. Observe the output in your command prompt/terminal for confirmation of a successful flash.
Verifying Installation
After flashing TWRP, it’s crucial to verify the installation was successful. This prevents potential issues when you later try to use the recovery.
Method 1: Booting Directly into TWRP. The most straightforward method is to directly boot your device into TWRP recovery. Usually, this is done by holding a specific combination of volume and power buttons while the device is powered off. Consult your device’s specific instructions for the correct key combination. If TWRP successfully boots, the installation was successful. Be careful not to make any changes unless you’re sure of what you are doing.
Method 2: Using the ADB Command. A more technical approach utilizes the Android Debug Bridge (ADB). With your device connected to your PC and USB debugging enabled, open a command prompt or terminal window and enter the command adb reboot recovery. Successful booting into TWRP confirms correct installation.